Most teams talk about "going live" like it's the only way to run a real-time broadcast. It isn't. The fastest, most reliable live experiences in 2026 are pre-recorded videos streamed as live, polished content with the engagement benefits of a live event, minus the broken audio, dropped Wi-Fi, and forgotten record buttons.
TL;DR:
| Approach | Best for | Setup time | When to pick it |
|---|---|---|---|
| OBS + FastPix | One-off events, internal broadcasts, test runs | Under 10 minutes | Solo creators, marketers, quick launches |
| FastPix Cloud Playout | Scheduled programs, 24/7 channels, replays | Under 30 minutes | Recurring content, FAST channels, library replays |
| API-driven workflow | SaaS products, full automation, custom scheduling | Engineering integration | Building pre-recorded-live as a product feature |
For most teams running scheduled or recurring streams, Cloud Playout is the cleanest fit. For one-time events, OBS works fine. For SaaS platforms embedding this as a feature, the FastPix Live Streaming API gives you full programmatic control.
Most teams already have the content: demos, webinars, tutorials, interviews. But no consistent way to use it. Instead of letting that footage sit in your storage, streaming it "as live" gives it a second life. You reach a fresh audience, drive real-time engagement, and make your brand feel active without recording anything new.
And it's not just for convenience. Live playback triggers better retention, chat participation, and platform visibility. When you control the video quality upfront, you avoid the risks that come with actual live events: bad internet, broken audio, or someone forgetting to hit record.
There are a few ways to pull this off, each with its own strengths, depending on how often you stream, how much you want to automate, and how tightly streaming fits into your product or ops stack.
| Approach | Best For | How It Works | Notes |
|---|---|---|---|
| OBS + FastPix (DIY) | One-off events, internal broadcasts, test runs | Use OBS to stream a video via FastPix ingest (RTMPS/SRT) | Quick to set up. You can use FastPix dashboard to generate stream keys. |
| Cloud Playout | Scheduled programs, continuous channels, replays | Upload videos and build a live channel in the FastPix dashboard | Ideal for recurring content or turning your library into a 24/7 stream. |
| API Driven Workflow | SaaS platforms, automation, full backend integration | Use FastPix APIs to programmatically create, manage, and distribute streams | The same APIs power Cloud Playout. Best for full control and scale. |
Three main approaches (and what to actually use)
Depending on your setup and what you care about, there are a few ways to run a pre-recorded stream as live.
1. OBS + FastPix (Easy)
If you need to stream a pre-recorded video quickly - maybe a product launch, a one-time campaign, or an internal broadcast - using OBS Studio with FastPix is the simplest way to go live without actually going live.
You get the flexibility of OBS (overlays, scenes, transitions) and the reliability of FastPix’s live streaming infrastructure. OBS acts as your encoder. FastPix provides the stream key and global delivery. No programming required (you’re using only the FastPix dashboard) - just copy the RTMPS or SRT server URL and go.
When this makes sense
• Quick drops for launches or webinars
• Solo creators and marketers doing internal or public streams
• Teams testing workflows before committing to full automation
How it works:
Step 1: Generate a Live Stream with FastPix
Use the FastPix dashboard to create a new live stream. You'll get:
- Stream URL + Stream Key (RTMPS or SRT)
- Playback ID to construct the HLS output URL
- Optional settings like auto-recording or expiration time
Step 2: Configure OBS
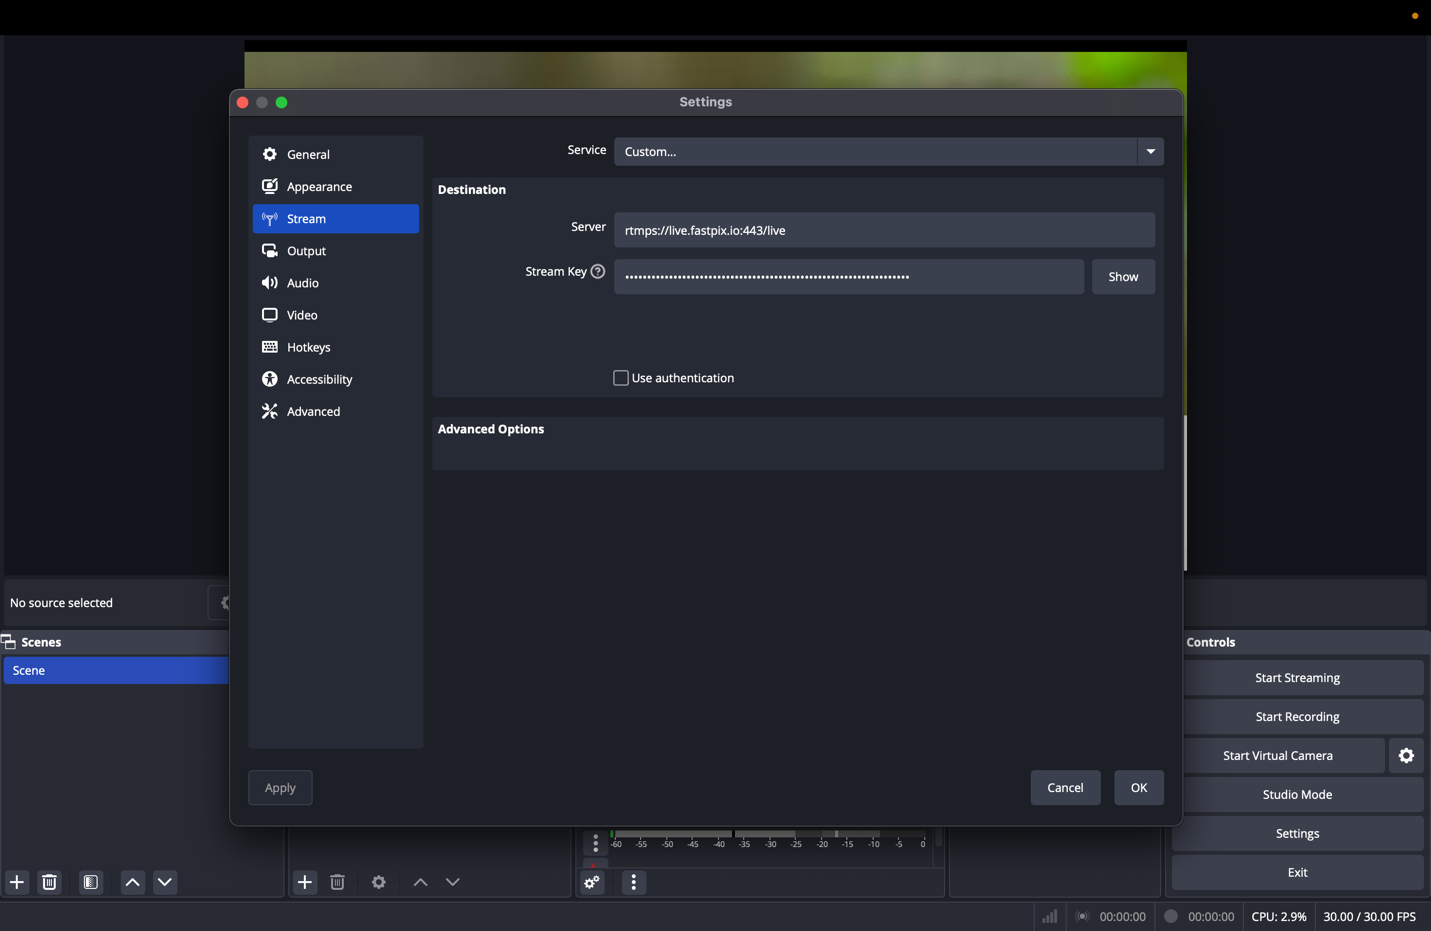
Install OBS Studio. Go to Settings → Stream, and choose your protocol:
- For RTMPS, paste the FastPix server URL and Stream Key
- For SRT, use the FastPix SRT address, stream ID, and passphrase
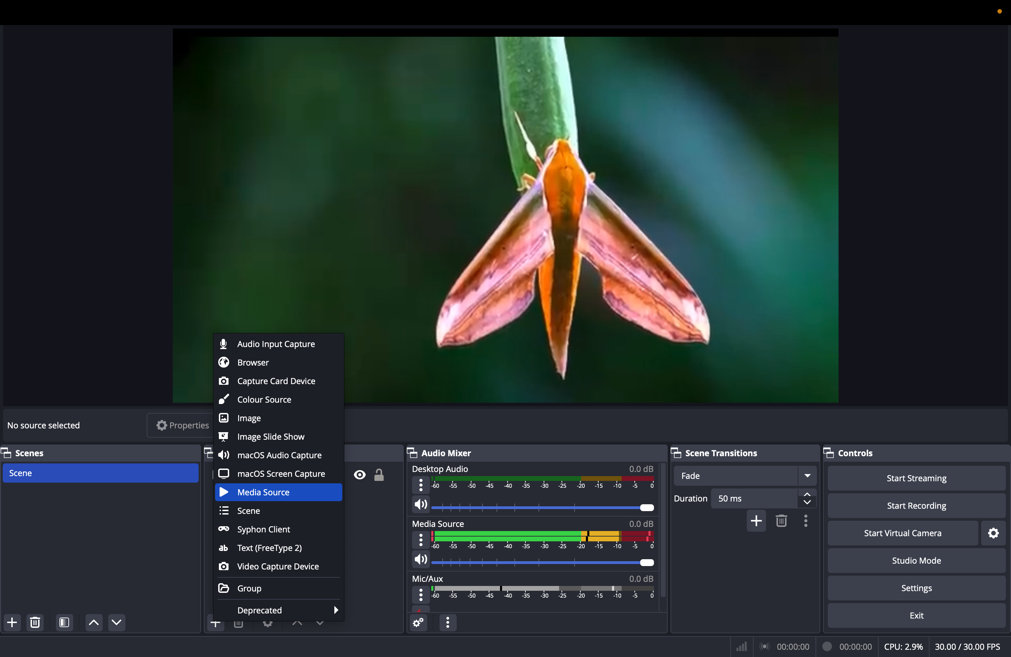
Step 3: Add Your Pre-Recorded Video
- In OBS, create a new scene
- Add your MP4, MOV, or MKV file as a Media Source
- Make sure “Loop” is unchecked and “Start playback when source becomes active” is selected
Step 4: Start Streaming
- Click “Start Streaming” in OBS. OBS sends the stream to FastPix, which handles encoding, adaptive bitrate, and playback delivery.
- Use the playback URL (https://stream.fastpix.io/{PlaybackID}.m3u8) in your app, web player, or landing page.
Want to try this on your own video first? Sign up for FastPix free and get $25 in credits with no credit card. You'll have a working RTMP URL and HLS playback in under 60 seconds, enough to test a 2-hour pre-recorded live broadcast end-to-end before committing to anything.
2. Cloud Playout Platform (Medium)
This is the cleanest way to stream pre-recorded videos “as live” without relying on local machines or OBS. FastPix’s Cloud Playout lets you take any uploaded video and schedule it to play out like a linear TV channel - with overlays, bumpers, ad cues, and full simulcast distribution.
You don’t need to manage infrastructure or encoding software. Everything from asset management to real-time stream generation runs in the cloud.
When to use this
You’ve got a large library of videos - tutorials, interviews, webinars, product demos - and you want to make better use of them. With FastPix Cloud Playout, you can turn that archive into a 24/7 live channel or schedule time-based broadcasts that run without manual effort.
Use this when you need to:
- Continuously stream a curated mix of videos without going live each time
- Create brand channels that look and feel like linear TV
- Multi-video programs with bumpers, slates, or ads
- Scalable, hands-free “live” streams from pre-recorded content
How it works:(See the video: How FastPix Cloud Playout works)
Step 1: Import your videos
Upload your pre-recorded content directly from your device or via URL. Add metadata tags to organize your assets and prep them for programming.
Step 2: Program as a playlist or program block
Create a playlist or assemble a single program using an Electronic Program Guide (EPG). Add bumpers, overlays, and slates where needed. You can also insert live segments if required.
Step 3: Create your playout channel
Create a looping or scheduled channel. Define start time, fallback slates, and ad insertion markers (e.g., SCTE-35) if monetizing. Choose playback behavior: loop, stop after play, or run on a timed schedule.
Step 4: Add monetization or overlays
You can insert pre-rolls, mid-roll ad cue points, or sponsor bumpers. Support for watermarking, lower-thirds, and timed overlays is available per program.
Step 5: Distribute as a live stream
FastPix generates a live HLS feed with adaptive bitrate. You can:
- Stream it on your own site with the FastPix Player
- Simulcast to YouTube, Facebook Live, Twitch, or any RTMP/SRT endpoint
Step 6: Monitor and manage
Use the FastPix dashboard to view real-time health (bitrate, viewers, error states). Trigger failover slates automatically if an asset fails. Pause or stop mid-stream if needed.
Pros
- Runs entirely in the cloud - no encoding hardware or local setup
- Native adaptive bitrate playback (ABR) for smooth playback across devices
- Multi-CDN delivery ensures global reliability and faster start times
- Supports scheduled drops, monetization, and overlays
- Easy to repeat, reuse, or rerun across time zones
Cons
- Requires learning the dashboard flow and programming model
- Need a planned content calendar
3. API Driven workflow (Hard but scalable)
If you’re building a product or internal tool that needs to stream pre-recorded videos as live - and you want complete control over how, when, and where it happens - this is the route that gives you the most flexibility.
FastPix offers a full suite of Live Streaming APIs that let you programmatically generate RTMP/SRT ingest URLs, manage stream lifecycles, trigger scheduled playout, and push to multiple destinations.
In fact, our Cloud Playout system is built on the same APIs. You can use those building blocks to create your own version - tightly integrated into your product or workflow, fully automated, and custom to your use case.
When to use this
- You’re a SaaS platform enabling customers to schedule content drops or run live-like events
- You want full programmatic control over ingest, scheduling, and distribution
Pros: Fully automated, scalable, developer friendly, repeatable workflows.
Cons: Requires engineering effort, setup complexity.
What works in practice
If you’re a solo creator or only running a handful of streams, OBS is fine. Just don’t expect to scale. For anything bigger, or if reliability matters, use cloud playout. If you’re running streaming as part of your own product or platform, go API-first.
Steps to set up pre-recorded live using OBS + FastPix
1. Prepare your video content
- Record your video in advance using any video recording software.
- Ensure the content is well-edited, with smooth transitions, clear audio, and polished visuals.
- Save the video in a compatible format like MP4 or MOV for seamless integration.
2. Log in to the FastPix dashboard
- Go to dashboard.fastpix.io.
- Create an account if you don’t already have one.
- Navigate to the Live Page and click Create Live Stream.

- Once the stream is created, copy the RTMPS URL and stream key from the Details Page for use in OBS.
3. Set up OBS studio
What is OBS studio?
OBS Studio is a free, open-source software used for live streaming and video recording. It lets you broadcast high-quality content on platforms like YouTube, Twitch, and Facebook. Its customizable features and performance optimizations make it a go-to choice for professionals and casual users alike.
Why choose OBS studio?
- Cost-effective: Free and open-source with no hidden fees.
- High performance: Optimized for minimal CPU usage, ensuring smooth streams even during resource-intensive tasks.
- Customizable: Offers extensive options for layouts, media sources, and effects.
4. Configure OBS for pre-recorded streams
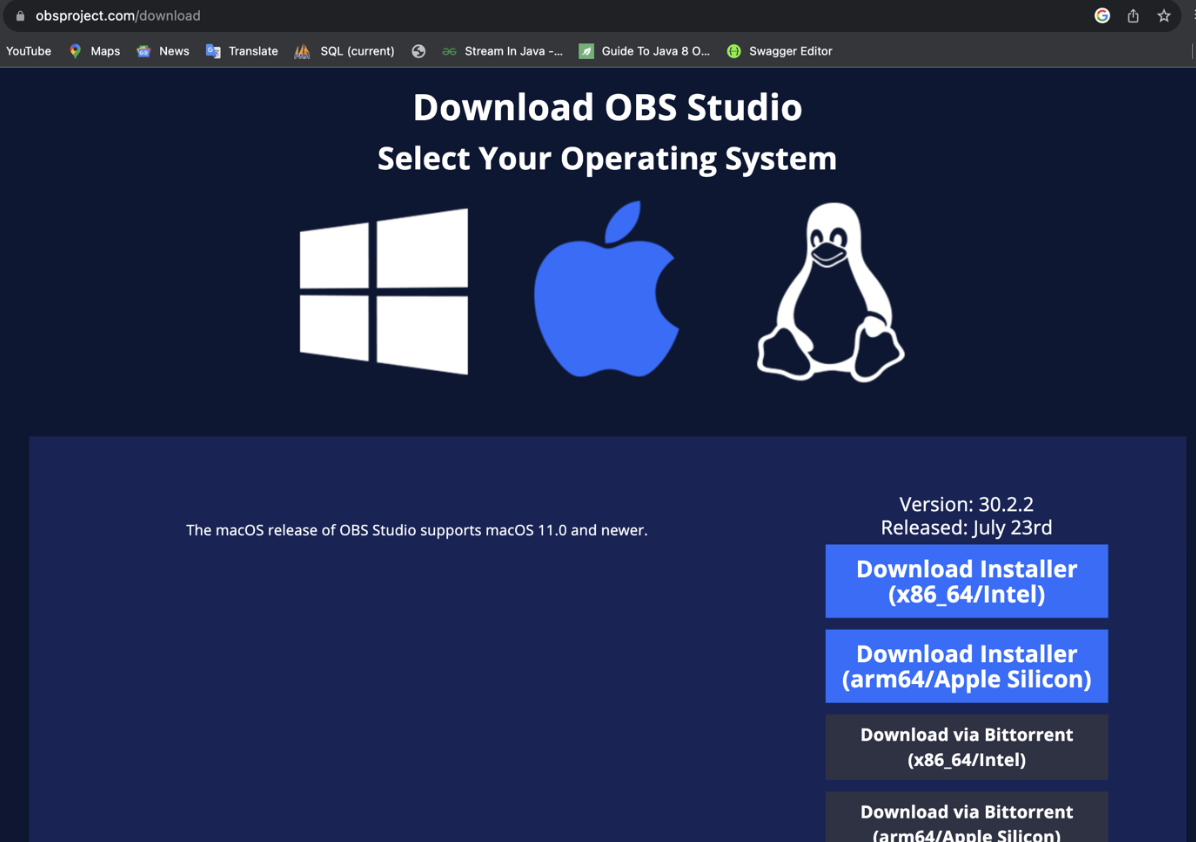
Step 1: Download and Install OBS
- Visit obsproject.com to download OBS for your operating system.
Step 2: Create a new scene
- Open OBS and locate the Scenes section (bottom left).
- Click the + icon to create a new scene, naming it based on your content (e.g., Product Demo)

Step 3: Add your video as a media source
- In the Sources section, click the + icon and select Media Source.
- Name the source for easy identification, then browse and upload your video file.
- Enable settings like looping or restart playback based on your streaming needs.
Step 4: Configure stream settings
- Go to Settings > Stream in OBS.
- Select your streaming platform in the service(Custom) option and enter the FastPix's RTMPS URL and Stream Key.
5. Test your setup
Testing is crucial to ensure your stream runs smoothly.
- Click Start Recording to preview your video’s playback quality.
- Check for issues like lag, audio-video sync problems, or glitches.
- Adjust video positioning, audio levels, or other settings as needed.
6. Going live: How to start your stream
- Once everything is set up, it's time to go live:
- Final checks: Ensure your scenes and sources are correctly configured.
- Start streaming:Click Start Streaming in OBS.
- Go to your stream dashboard to monitor your stream's performance and interact with viewers.
7. Optimizing OBS settings for stream
To ensure a smooth streaming experience, it's important to optimize your OBS settings:
Settings > Output settings:
- Set your video bitrate to 2500-6000 Kbps (depending on your internet speed).
- Choose the encoder: Select hardware (NVENC) if you have an NVIDIA GPU or software (x264) for CPU encoding.
- Set the audio bitrate to 160 Kbps for clear audio quality.
Settings > Video settings:
- Set the base (canvas) resolution to your monitor's resolution.
- Set the output (scaled) resolution to 720p or 1080p.
- Set the common FPS values to 30 or 60 FPS.
8. End and review the stream
- Once the video finishes, click Stop Streaming in OBS.
Best practices for streaming pre-recorded videos
To ensure a seamless and engaging experience when streaming pre-recorded videos, adhere to these best practices with technical insights:
Conduct comprehensive testing
- Perform a dry run to check for audio-visual synchronization, encoding settings, and network stability.
- Use monitoring tools like OBS's stats panel or third-party analytics to detect potential frame drops, CPU overloads, or bandwidth issues.
Optimize video quality
- Utilize tools for video compression to maintain high quality while reducing file size.
- Choose the appropriate codec (e.g., H.264 for compatibility or HEVC for efficiency) and resolution (720p or 1080p) based on your audience's devices and bandwidth.
- Ensure proper keyframe intervals for smoother adaptive bitrate streaming, typically every 2 seconds.
Strategically schedule streams
- Analyze audience data using tools like analytics or platform-specific insights to identify peak engagement times.
- Account for global time zones if targeting international viewers, scheduling streams to maximize attendance.
Leverage post-stream engagement
- Extract highlights or key moments from the stream using FastPix clipping features.
- Share short clips or teasers on social media platforms to keep the audience engaged and drive traffic to your full content.
- Use captions and hashtags to improve discoverability and accessibility.
Use advanced video settings
- Set optimal bitrate levels for different resolutions to balance quality and bandwidth efficiency (e.g., 4500–6000 Kbps for 1080p at 30 FPS).
- Enable closed captions or subtitles for accessibility and wider reach.
By implementing these practices, you can ensure that your pre-recorded streams maintain technical excellence, engage your audience effectively, and leave a lasting impression.
Benefits of simulated live streams
Simulated live streams combine the polish of pre-recorded content with the interactivity of live events, making them a versatile solution for various industries. Here are tailored examples highlighting their potential:
- Gaming: Stream pre-recorded gameplay walkthroughs or tutorials as live events, providing a seamless viewing experience. During the stream, use real-time chat or Q&A sessions to engage with viewers, answer questions, or offer gameplay tips, enhancing community interaction.
- Education: Deliver pre-recorded lectures, ensuring consistent, high-quality content delivery across sessions. Complement this with a live chat feature or moderated Q&A to address student queries in real-time, promoting a dynamic and collaborative learning environment.
- Marketing and Product Demonstrations: Showcase pre-recorded product demos to ensure every detail is presented flawlessly. Incorporate live polls, surveys, or Q&A sessions during the stream to capture audience feedback and gauge interest levels, enabling data-driven insights into customer preferences.
Simulated live streams provide the flexibility to curate polished content while maintaining the interactive elements that make live broadcasts engaging, making them a powerful tool for industries prioritizing both quality and viewer engagement.
Building a product where this is a feature, or running scheduled streams at scale? Start free on FastPix: $25 in credits, no card required. Cloud Playout for scheduled channels, full Live Streaming API for SaaS workflows, and Video Data analytics free up to 100K views per month, all on one pay-as-you-go bill.
Conclusion
Streaming pre-recorded videos as live events offers the perfect balance between polished content and audience engagement. Experiment with various formats and schedules to discover what resonates best with your viewers, and use feedback to refine your approach.
FastPix's Live Streaming API simplifies this process, allowing you to broadcast high-quality video to your audience seamlessly. With support for RTMP and SRT inputs, adaptive bitrate streaming, and automatic recording for on-demand playback, FastPix ensures a professional and engaging streaming experience.
FAQs
What is the best way to stream a pre-recorded video as live in 2026?
It depends on scale and automation requirements. For one-off events, OBS with FastPix can get a live stream running in under 10 minutes. For recurring broadcasts or 24/7 channels, FastPix Cloud Playout schedules videos and runs them as continuous live streams without manual switching. SaaS platforms that need programmatic control can use the FastPix Live Streaming API for ingest, scheduling, and distribution through code.
Can I stream a pre-recorded video as live without using OBS?
Yes. FastPix Cloud Playout allows you to upload a video and schedule it as a live broadcast directly through the dashboard or API without requiring OBS, external encoders, or a local machine. The same APIs are also available for developers who want to build the workflow directly into their own applications.
How much does it cost to stream a pre-recorded video as live?
FastPix uses a pay-as-you-go pricing model where encoding is free on the standard plan, so you only pay for delivery and storage. New accounts receive $25 in credits, which is typically enough to run a multi-hour pre-recorded live broadcast end-to-end. There are no setup fees, minimum commitments, or credit card requirements to get started.
What does it mean to stream a pre-recorded video as live?
Streaming a pre-recorded video as live means broadcasting previously recorded content in real time so viewers experience it as a live event. This combines the production quality and editing control of recorded video with the engagement dynamics of live streaming.
Why would I stream a pre-recorded video instead of going live?
Pre-recorded live streaming allows creators and teams to polish content before broadcast, reducing the risk of technical failures or presentation mistakes during a live event. It also helps schedule broadcasts for different time zones and lets teams deliver a more consistent experience to global audiences.
Can I schedule a pre-recorded video to stream live at a later time?
Yes. FastPix Cloud Playout includes scheduling features that let you define the exact date and time a pre-recorded video should begin broadcasting. The platform also supports recurring loops, ad insertion blocks, and live breakovers within the same channel workflow.
Will viewers know that the live stream is pre-recorded?
That depends on how you present the event. Some creators choose to disclose that the stream is pre-recorded to maintain transparency and trust, while others preserve the live-event experience without explicitly mentioning it.
Can I track performance during a pre-recorded video live stream?
Yes. FastPix provides real-time analytics that track viewer engagement, drop-off rates, playback performance, and other streaming metrics during the live broadcast. Video Data analytics are free for up to 100K views per month.
Can I use pre-recorded videos for live webinars?
Yes. Pre-recorded videos are commonly used for live webinars because they allow presenters to deliver polished content while still interacting with attendees through live chat or Q&A. FastPix Cloud Playout also supports overlays and scheduled live breakovers for hybrid webinar workflows.
What platforms support streaming pre-recorded videos as live events?
FastPix delivers pre-recorded live streams as HLS or DASH playback URLs compatible with web, mobile, OTT, and smart TV platforms. The same stream can also be simulcast to YouTube, Facebook Live, Twitch, or any RTMP or SRT endpoint from a single FastPix workflow.